Well, let's test it on Debian GNU/Linux (and it should work on Ubuntu and other derivatives too)...
Showing posts with label Debian. Show all posts
Showing posts with label Debian. Show all posts
2016-11-23


2016-06-09
HOWTO: fix mic settings on Acer Aspire 3810T notebook in Linux
Once upon a time... You try a Linux Skype version (e. g., 4.3.0.37-1 for Debian) on Acer Aspire 3810T notebook and no sound is heard from the internal microphone.
The microphone is not muted in AlsaMixer (
Let's record some mic sound using Audacity audio editor... Here is a screenshot:
 As you can see, the right channel ("R") is simply inverted left channel ("L"); let's call that "R=-L".
Let's look at the system environment details...
Nothing interesting, except the Realtek ALC269 audio codec.
Thus, it's time to look at the microphone itself.
 Terminal markings (DATA, VDD, CLK, GND) suggest it's a digital microphone (not analog one), and it looks like a mono (1-channel) one.
Fortunately, there is a way to fix the problem: you should create a
If you're interested, you can get some info about some kernel modules:
But let's get back to the configuration.
Create, e. g., a
Let's try some model names that look usable.
External links:
The microphone is not muted in AlsaMixer (
alsamixer); in PulseAudio Volume Control (pavucontrol) mic looks OK too.Let's record some mic sound using Audacity audio editor... Here is a screenshot:

Let's look at the system environment details...
$ uname -a
Linux Notebook1 4.5.0-1-amd64 #1 SMP Debian 4.5.1-1 (2016-04-14) x86_64 GNU/Linux

$ cat /proc/asound/version
Advanced Linux Sound Architecture Driver Version k4.5.0-1-amd64.

$ dmesg | grep Acer
[    0.000000] DMI: Acer Aspire 3810T/Aspire 3810T, BIOS V1.28 08/10/2010
...

$ dmesg | grep snd_hda_codec_realtek
[    3.796475] snd_hda_codec_realtek hdaudioC0D0: autoconfig for ALC269: line_outs=1 (0x14/0x0/0x0/0x0/0x0) type:speaker
[    3.796496] snd_hda_codec_realtek hdaudioC0D0:    speaker_outs=0 (0x0/0x0/0x0/0x0/0x0)
[    3.796510] snd_hda_codec_realtek hdaudioC0D0:    hp_outs=1 (0x15/0x0/0x0/0x0/0x0)
[    3.796522] snd_hda_codec_realtek hdaudioC0D0:    mono: mono_out=0x0
[    3.796531] snd_hda_codec_realtek hdaudioC0D0:    dig-out=0x1e/0x0
[    3.796540] snd_hda_codec_realtek hdaudioC0D0:    inputs:
[    3.796550] snd_hda_codec_realtek hdaudioC0D0:      Mic=0x18
[    3.796559] snd_hda_codec_realtek hdaudioC0D0:      Internal Mic=0x12

$ dmesg | grep HDA
[    3.854039] input: HDA Digital PCBeep as /devices/pci0000:00/0000:00:1b.0/sound/card0/input13
[    3.855277] input: HDA Intel Mic as /devices/pci0000:00/0000:00:1b.0/sound/card0/input14
[    3.855365] input: HDA Intel Headphone as /devices/pci0000:00/0000:00:1b.0/sound/card0/input15
[    3.855451] input: HDA Intel HDMI/DP,pcm=3 as /devices/pci0000:00/0000:00:1b.0/sound/card0/input16

$ cat /proc/asound/pcm
00-00: ALC269 Analog : ALC269 Analog : playback 1 : capture 1
00-01: ALC269 Digital : ALC269 Digital : playback 1
00-03: HDMI 0 : HDMI 0 : playback 1

$ cat /sys/module/snd_hda_intel/parameters/model
(null),(null),(null),(null),(null),(null),(null),(null),(null),(null),(null),(null),(null),(null),(null),(null),(null),(null),(null),(null),(null),(null),(null),(null),(null),(null),(null),(null),(null),(null),(null),(null)
Thus, it's time to look at the microphone itself.

Fortunately, there is a way to fix the problem: you should create a
modprobe configuration file with appropriate settings for Intel HDA driver kernel module.If you're interested, you can get some info about some kernel modules:
$ /sbin/modinfo snd-hda-intel
...
$ /sbin/modinfo snd-hda-codec-realtek
...
Create, e. g., a
/etc/modprobe.d/sound.conf file and put an appropriate configuration string (i. e., options snd-hda-intel model=MODEL, where MODEL is a specific model string) into it:
$ sudoedit /etc/modprobe.d/sound.conf
...
- "
laptop-amic".
Some minor changes indmesgoutput:And major effects on mic sound output:$ dmesg | grep snd_hda_codec_realtek ... [ 3.803435] snd_hda_codec_realtek hdaudioC0D0: inputs: [ 3.812954] snd_hda_codec_realtek hdaudioC0D0: Mic=0x18 [ 3.817411] snd_hda_codec_realtek hdaudioC0D0: Internal Mic=0x19 [ 3.817414] snd_hda_codec_realtek hdaudioC0D0: Internal Mic=0x12
Yes, funny enough, it's a stereo low-level noise, and there's no intelligible sound (!); and that's not strange: "amic" stands for "analog microphone", so it's just a useless option for digital ones.
- "
laptop-dmic".
R=-L (no significant changes).
- "
alc269-dmic".
R=L.
- "
alc271-dmic".
R=-L (no significant changes).
- "
inv-dmic".
Some audio signal in the left channel, and no signal (zero level) in the right one (R=0).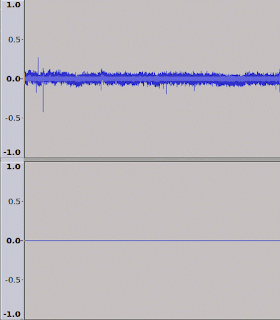


inv-dmic" represents the real configuration (if you want pseudo-stereo, you can also try "alc269-dmic"); so here is my suggested config:
$ cat /etc/modprobe.d/sound.conf
options snd-hda-intel model=inv-dmic

$ cat /sys/module/snd_hda_intel/parameters/model
inv-dmic,(null),(null),(null),(null),(null),(null),(null),(null),(null),(null),(null),(null),(null),(null),(null),(null),(null),(null),(null),(null),(null),(null),(null),(null),(null),(null),(null),(null),(null),(null),(null)
- https://git.kernel.org/cgit/linux/kernel/git/torvalds/linux.git/tree/sound/pci/hda/patch_realtek.c (kernel/git/torvalds/linux.git - Linux kernel source tree)
- ALSA - Debian Wiki
- HdaIntelSoundHowto - Community Help Wiki (Ubuntu)
2016-05-20
Software: gpm, a mouse service for Linux console
There's a nice piece of software called gpm (general purpose mouse).
It's a mouse server for Linux console. (BTW, touchpads are supported too).
In Debian (and its derivatives like Ubuntu), it's very easy to start using it by simple installation from package repositories:
And you should see a rectangular mouse pointer soon ;)
In case it gets stuck, you can try restarting the gpm service this way:
or, a more generic command if you don't use Debian:
See also: HOWTO: reload mouse driver in Linux
External links:
It's a mouse server for Linux console. (BTW, touchpads are supported too).
In Debian (and its derivatives like Ubuntu), it's very easy to start using it by simple installation from package repositories:
# apt-get install gpmIn case it gets stuck, you can try restarting the gpm service this way:
# service gpm restart# /etc/init.d/gpm restartExternal links:
- gpm - general purpose mouse (official site)
- Debian Package Tracker - gpm
---
Last updated: 2016-07-04
Last updated: 2016-07-04
2016-01-27
HOWTO: play MIDI files with VLC in Debian
It's very easy! And should also work for Ubuntu (and other Debian derivatives).
- First of all, make sure you have already installed the VLC media player:
# apt-get install vlc - Install the FluidSynth plugin:
# apt-get install vlc-plugin-fluidsynth - Enjoy!
You can open your file either with the VLC GUI, or from the CLI, e. g.:
$ vlc ~/Music/MyFavoriteSong.midi
2015-12-28
HOWTO: preventing aptitude from breaking the APT package setup
Initial conditions:
P. S. This should also work for Debian derivatives (e. g. Ubuntu).
- usually, you use apt-get (from the apt package) for Debian package maintenance (installing, removing, upgrading etc.);
- sometimes you launch aptitude (aptitude package) to do some work;
- after doing some work with apt-get, you notice that aptitude hasn't caught up with the current package state (i. e., it wants to install / remove some package(s) just from the start).
$ cd /var/lib/aptitude
# mv pkgstates pkgstates.old
2014-07-01
Outdated important software packages in Debian unstable
2013-11-25
dd utility: the rescue versions
Apart from the traditional implementations of a Unix dd utility (e. g., one found in the GNU Core Utilities), there are some special versions of it, dedicated for rescuing the data from damaged (badly readable) disks:
The convenient way to use this utility is to make an image (a binary dump) of the whole defective disk (FDD, HDD, CD, DVD etc.) with its help, and then apply data recovery / content extraction programs (e. g., TestDisk) directly to the disk image.
Anyway, regular backups & redundant data storage solutions should save you from data recovery problems :-)
References:
Last updated: 2013-12-08
- GNU ddrescue (by Antonio Diaz Diaz);
seems to be the best choice from these two ones [1, 2];
there's a GUI log viewer for it (ddrescueview), and also some other helper utilities (ddrutility); - dd_rescue (by Kurt Garloff);
there's also a wrapper script for it called dd_rhelp.
# apt-get install gddrescueAnyway, regular backups & redundant data storage solutions should save you from data recovery problems :-)
References:
- Disk drive recovery: ddrescue, dd_rescue, dd_rhelp - System Administration Bits of Knowledge (by John Gilmore)
- Damaged Hard Disk - CGSecurity
Last updated: 2013-12-08
2013-08-31
HOWTO: configure the OS to use a 100 Hz refresh capable CRT monitor in Linux
- Test environment.
- Hardware
- Monitor: Samsung SyncMaster 959NF
- Test display resolution:
1024 * 768 @ 100 Hz
- Test display resolution:
- Video card: based on Nvidia GeForce2 MX400
$ lspci | grep -i nvidia 01:00.0 VGA compatible controller: NVIDIA Corporation NV11 [GeForce2 MX/MX 400] (rev b2) - CPU: x86-compatible (some old AMD Athlon one)
- Monitor: Samsung SyncMaster 959NF
- Software
- OS: Debian GNU/Linux 7.0 "Wheezy" / i386
- Video driver: nouveau
- Hardware
-
X11 graphical mode configuration.
- Use
cvtutility to generate a modeline for X11:
Note: 100 Hz is a non-standard refresh rate for CVT.$ cvt 1024 768 100 # 1024x768 99.97 Hz (CVT) hsync: 81.58 kHz; pclk: 112.25 MHz Modeline "1024x768_100.00" 112.25 1024 1096 1200 1376 768 771 775 816 -hsync +vsync
If CVT timings don't work for some ancient monitor, you can also try to usegtfutility to generate somewhat older GTF timings:
Both$ gtf 1024 768 100 # 1024x768 @ 100.00 Hz (GTF) hsync: 81.40 kHz; pclk: 113.31 MHz Modeline "1024x768_100.00" 113.31 1024 1096 1208 1392 768 769 772 814 -HSync +Vsynccvt>futilities are part ofxserver-xorg-coreDebian package. - Change X11 settings by putting the generated modeline into the proper section of the
/etc/X11/xorg.conffile:
Section "Monitor" Identifier "Monitor0" VendorName "Samsung" ModelName "SyncMaster" HorizSync 30.0 - 110.0 VertRefresh 50.0 - 160.0 Option "DPMS" "true" Modeline "1024x768_100.00" 112.25 1024 1096 1200 1376 768 771 775 816 -hsync +vsync EndSection Section "Screen" Identifier "Screen0" Monitor "Monitor0" DefaultDepth 24 SubSection "Display" Depth 24 Modes "1024x768_100.00" EndSubSection EndSection - Restart the X server for updated configuration to take effect.
- Use
-
Here are the sample settings for non-X11 user interfaces, put into
/etc/default/grub(the GRUB2 config).
For modified settings to make effect, don't forget to executeupdate-grub2as superuser and then reboot.
Notes:... GRUB_CMDLINE_LINUX="video=VGA-1:1024x768M@100" ... # The resolution used on graphical terminal # note that you can use only modes which your graphic card supports via VBE # you can see them in real GRUB with the command `vbeinfo' GRUB_GFXMODE=1024x768 ...- The Linux command line option mentioned aboves allows to set a desirable video mode for virtual console using kernel mode setting (KMS).
There's more info about KMS settings on nouveau Wiki. - Display refresh rate doesn't seem to be specifiable for GRUB bootloader graphical mode. This initial graphic mode depends heavily on VBE.
- Other caveats: video play in console framebuffer (i. e., using
mplayer) has not seemed to work for me in this test setup.
- The Linux command line option mentioned aboves allows to set a desirable video mode for virtual console using kernel mode setting (KMS).
See also:
2013-04-11
HOWTO: convert audio CD image (FLAC + CUE) to MP3 tracks in Linux
Imagine you've archived your favourite audio CD into FLAC/CUE pair format (or maybe you've purchased some album in that digital downloadable lossless audio format, who knows), and now you want to convert it to the standard MP3 files for playing that album in your good old digital music player.
Let the files be processed in Debian GNU/Linux environment (sample commands tested in Debian 7.0 "Wheezy", and should also work for all Debian-based distros, e. g. Ubuntu, Mint etc.; Bash shell is assumed to be installed & used by default).
First of all, you should install all the necessary tools: FLAC (for decoding FLAC to WAV), LAME (to convert WAV to MP3), cuetools (to parse the CUE sheet) and shntool (to cut the big WAV file into smaller tracks according to the CUE sheet breakpoints).
Then the conversion process itself begins.
The output files are by default MP3 VBR V0, 44.1 KHz, Joint Stereo; it should be decent for most situations.
After conversion, you can process
Enjoy.
Let the files be processed in Debian GNU/Linux environment (sample commands tested in Debian 7.0 "Wheezy", and should also work for all Debian-based distros, e. g. Ubuntu, Mint etc.; Bash shell is assumed to be installed & used by default).
First of all, you should install all the necessary tools: FLAC (for decoding FLAC to WAV), LAME (to convert WAV to MP3), cuetools (to parse the CUE sheet) and shntool (to cut the big WAV file into smaller tracks according to the CUE sheet breakpoints).
# apt-get install flac lame cuetools shntool$ flac -d MyMusic.flac
$ cuebreakpoints MyMusic.cue | shnsplit MyMusic.wav
$ rm MyMusic.wav
$ for file in split-track*.wav; do lame -V0 $file; done
$ rm split-track*.wavAfter conversion, you can process
split-track*.mp3 files with your favourite media tagger application.Enjoy.
2013-03-10
HOWTO: losslessly convert FLV video to MP4 in Linux (Debian)
Well, let's imagine we have a Flash Video (FLV/F4V) container file (possibly "unseekable" or with other minor problems) containing MPEG-4 AVC video & AAC (or MP3) audio.
We'll convert ("remux") it to MP4 without any transcoding (re-encoding), so it'll be very fast, and using only the free tools (available in the official Debian GNU/Linux repositories).
Note: unfortunately, old FLV videos containing VP6 and Sorenson video formats can't be remuxed into MP4 format; if you don't want re-encoding, you can try to remux them into MKV (Matroska); if you just want to fix the seek problems, you can just try FLV-to-FLV remuxing.
Source software packages availability for Debian releases:
And yes, it should work for Ubuntu too; any current FFmpeg version should also work in other GNU/Linux or *BSD distros, MS Windows, Apple Mac OS X etc.
References:
We'll convert ("remux") it to MP4 without any transcoding (re-encoding), so it'll be very fast, and using only the free tools (available in the official Debian GNU/Linux repositories).
Note: unfortunately, old FLV videos containing VP6 and Sorenson video formats can't be remuxed into MP4 format; if you don't want re-encoding, you can try to remux them into MKV (Matroska); if you just want to fix the seek problems, you can just try FLV-to-FLV remuxing.
- Method #1 (recommended): use
ffmpeg(it's the main utility from the FFmpeg project).
Install the "ffmpeg" package:
Convert a FLV file to MP4, preserving audio & video:# apt-get install ffmpeg
And even optimizing it for faster loading:$ ffmpeg -i input.flv -codec copy output.mp4
To extract audio only:$ ffmpeg -i input.flv -codec copy -movflags faststart output_optim.mp4
To extract video only:$ ffmpeg -i input.flv -codec copy -vn output_a.mp4
Note: you can also use M4A (audio) / M4V (video) file extensions for output, if you like those Apple formats.$ ffmpeg -i input.flv -codec copy -an output_v.mp4 - Method #2 (alternative): using
avconv(it's a part of Libav project, a fork of FFmpeg).
Install the "libav-tools" package:
Convert a FLV file to MP4, preserving audio & video:# apt-get install libav-tools
To extract audio only:$ avconv -i input.flv -codec copy output.mp4
To extract video only:$ avconv -i input.flv -codec copy -vn output_a.mp4
$ avconv -i input.flv -codec copy -an output_v.mp4 - Method #3 (a somewhat ugly one): using MEncoder (a part of the MPlayer project).
Install MEncoder:
Convert a FLV file to MP4:# apt-get install mencoder
Note: according to the warning from MEncoder itself, output file can be corrupt:$ mencoder input.flv -ovc copy -oac copy -of lavf -o output.mp4So probably it suggests that you should better try the MEncoder's favorite AVI format:** MUXER_LAVF ***************************************************************** REMEMBER: MEncoder's libavformat muxing is presently broken and can generate INCORRECT files in the presence of B-frames. Moreover, due to bugs MPlayer will play these INCORRECT files as if nothing were wrong! *******************************************************************************
(But that's not what we want here, right?)$ mencoder input.flv -ovc copy -oac copy -o output.avi
Source software packages availability for Debian releases:
- ffmpeg: up to Debian 6 "Squeeze", and then again from 9 "Stretch" (also in 8 "Jessie" backports);
- libav: starting from 7 "Wheezy" (also in 6 "Squeeze" backports), up to 8 "Jessie";
- mplayer: up to 7 "Wheezy", and then from 9 "Stretch".
And yes, it should work for Ubuntu too; any current FFmpeg version should also work in other GNU/Linux or *BSD distros, MS Windows, Apple Mac OS X etc.
References:
- ffmpeg Documentation
- Libav documentation : avconv
- 6.1. Selecting codecs and container formats - Chapter 6. Basic usage of MEncoder (MPlayer - The Movie Player documentation)
- Wikipedia:
---
Last updated: 2017-12-28
Last updated: 2017-12-28
2013-01-25
HOWTO: make Jigdo use local APT cache
If you like to build Debian install CD images with Jigdo (i. e., with
To make it easily selectable from the Jigdo interface, make sure to add the following line to the
BTW:
References:
jigdo-lite), you may consider using packages from your local APT cache to save some network traffic.To make it easily selectable from the Jigdo interface, make sure to add the following line to the
~/.jigdo-lite config file:scanMenu='/var/cache/apt/archives/ /media/cdrom/'/var/cache/apt/archives is a local APT cache directory (containing already downloaded DEB packages); /media/cdrom is a standard CD mount point, so you can reuse the files from the mounted CD image you've previously generated with Jigdo.References:
2012-12-13
Debian Multimedia vs dmo
Be careful:
- http://www.deb-multimedia.org [AKA "dmo",
formerlydebian-multimedia.org(CAUTION: as of June 2013, the old domain has expired and been taken over by some cybersquatters; thanks to the official Debian Project blog for news)]
is not an official Debian repository —
it's a private archive administered by a DD [Debian Developer] named Christian Marillat (with some assistance from another DD, Thibaut Varene):
please read the explanation in the Debian Multimedia FAQ and a discussion between Christian Marillat & Stefano Zacchiroli (the DPL [Debian Project Leader] at that time) regarding the dmo domain name etc.; - well, dmo contains some useful software which still hasn't made its way into Debian archives or simply can't be pushed there due to non-free licenses, software patents etc.;
some packages duplicate the official Debian ones, but differ in some configurations etc.; - installing multimedia software from dmo also pulls dmo versions of related libraries (e. g., libavcodec*);
all installed packages which have corresponding dmo ones will get "upgraded" to dmo versions too (if you don't lock them explicitly);
it can not only break some "unrelated" software functionality:
if you decide to stop using dmo repository, you'll also need to restore the affected packages to Debian official versions manually
due to version conflicts (e. g., to get a higher priority, dmo packages often use a greater "epoch" version number compared to packages in official Debian archives); - the best way to use that resource is not to add it to the APT reposiories lists;
instead of that, it's better to download & install individual packages from there;
in many cases, dmo's binary DEB packages wouldn't install correctly on a clean Debian system, so you need to download the source packages, correct them (in most cases, all you need is just to correct / modify / clean the dependencies) and build the binary packages with an automated tool like pbuilder;
after that, manually install the built packages:and attempt to resolve the dependencies:# dpkg -i somepackage.deb# apt-get -f install - if you still want to use dmo as an APT repository, consider using mirrors to save some bandwidth for the main dmo website :)
2012-07-29
And now for Debian "testing" / LXDE
After all the Ubuntu / Unity / GNOME 3 challenges, I've switched to Debian "testing" (pre-"Wheezy") distribution with LXDE, and it even seems to be usable :)
http://wiki.debian.org/LXDE
http://wiki.debian.org/LXDE
2011-08-29
HOWTO: recovering Linux hibernate functionality after modification of the swap partition
If you change the swap partition and forget about adjusting some settings, your GNU/Linux system can lose its hibernate functionality (it will hibernate, but not resume correctly — you'll lose your hibernated session if you boot with your default system settings).
Here follows a quick solution (tested in Debian & Ubuntu).
Assume you've created a new swap partition and listed it in
You can also get the swap partition UUID with
Then you need to check and modify
As you can see, the UUID of resume partition is not correct. You can edit that file with any text editor you like (gedit, nano, vi etc.), e. g.:
or
or
After all these manipulations, it's needed to update the initramfs image (it's usually stored in a file named like
Folks say there is an alternative temporary solution based on applying a kernel option like
References:
Here follows a quick solution (tested in Debian & Ubuntu).
Assume you've created a new swap partition and listed it in
/etc/fstab:user@machine:~$ cat /etc/fstab | grep swap
UUID=12345678-12ab-cd34-5678-445566778800 none swap sw 0 0blkid command:user@machine:~$ sudo blkid | grep swap
[sudo] password for user:
/dev/sda8: UUID="12345678-12ab-cd34-5678-445566778800" TYPE="swap"resume file to match the UUID of swap partition.user@machine:~$ cat /etc/initramfs-tools/conf.d/resume
RESUME=UUID=12345678-0000-0000-0000-123456789012$ sudo nano /etc/initramfs-tools/conf.d/resume$ sudoedit /etc/initramfs-tools/conf.d/resume$ gksu gedit /etc/initramfs-tools/conf.d/resume'initrd.img'):$ sudo update-initramfs -uresume=/dev/sda8 (where /dev/sda8 is a hibernate / swap partition), but usually there's no reason to do that (except the urgent manual restoring of the badly hibernated session, at the boot time).References:
Subscribe to:
Posts (Atom)